Initial screen
The initial screen offers the basic account settings, the choice of the local network interface, the signalling port, the IP version, the transport protocol and the remote server. While SIP Inspector can work with values that are written into a scenario file, the best results and portability are achieved when scenarios are written with keywords. Such scenarios are highly portable between computers and between users. Keywords in a scenario are replaced with the content of certain fields of this screen. For example, if a scenario is written as if the call is made from [fromUsername] and to [toUsername], changing ‘From’ and ‘To’ in the Account info is the way to change the numbers of the caller and the called party.
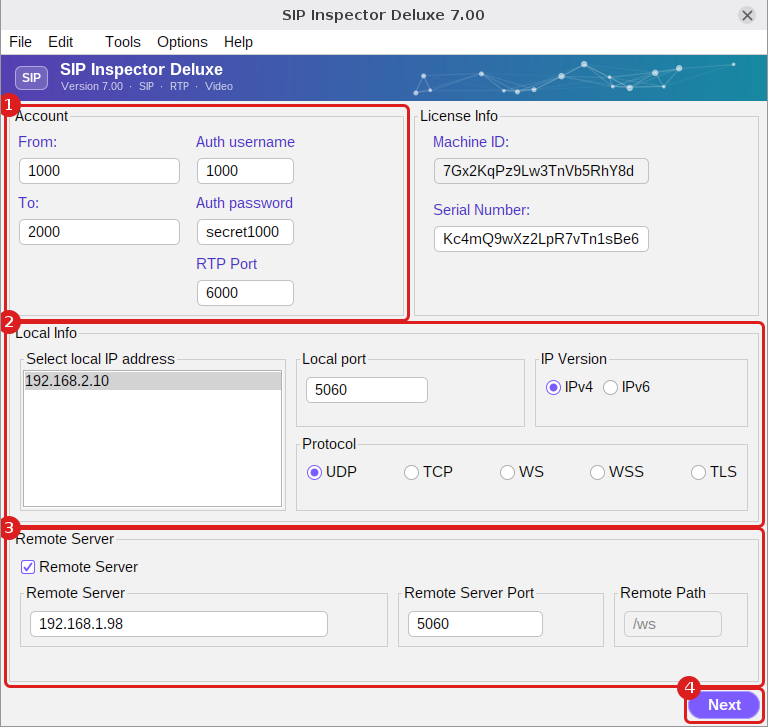
1st step: Account Info provides the basic information that is used when brand new SIP messages are created. The content of ‘From:’ and ‘To:’ replaces the keywords [fromUsername] and [toUsername]. ‘Auth username’ and ‘Auth password’ replace [authUsername] and [authPassword]. The RTP port is the port the tool uses to accept and to send RTP from. It replaces the keyword [media_port]. The first call uses the given port; if more calls are generated the port grows with every new call.
2nd step: Local Info. SIP Inspector detects the installed and enabled network adapters of the computer and lists all local IP addresses. Most users have a single adapter and a single address. The SIP signalling port is typically 5060, but it can be changed. For the transport protocol choose one of UDP, TCP, WS, WSS or TLS; standard SIP uses UDP. IPv4 and IPv6 are both supported. If you are not sure what the difference is, stay with the defaults, IPv4 and UDP. For TCP and TLS the program binds to the given port, and if it works as a client an ephemeral port is used for outgoing messages.
3rd step: Remote Server. If the tool works as a client, ‘Remote Server’ and ‘Remote Server Port’ must be filled in. This is where SIP messages are sent. The field can have an IP address, an FQDN (Fully Qualified Domain Name) or an SRV name (_sip._udp.example.com). If the tool acts as a server, do not tick the ‘Remote Server’ check box. ‘Remote Path’ is used for WS and WSS.
4th step: ‘Next’ goes to the screen where SIP messages and scenarios are created.
Already at this screen it is possible to:
- load a scenario file (File/Load Scenario);
- load a values file (File/Load Values). If you ever have to deal with a variety of users, invest some energy into understanding this feature;
- create public and private cryptographic keys (Tools/Security Keys);
- create a self-signed certificate (Tools/Security Certificate);
- turn a Wireshark capture into a scenario (Tools/Trace to Scenario);
- choose the dark or the light theme and set the logging options (Options).